Tips for Sewing with Leather and Review of the Layla Bag Pattern
On Etsy, I recently came across the lovely Layla Bag Pattern, and I knew that making this cute leather purse would be a great way to use up some of the leather I got on my recent trip to Lorraine Fabrics. This purse has round, pleated panels, a lining, and a recessed zipper. The instructions are easy to follow, and I would say that it's at an advanced beginner level.
Disclosure: This post contains affiliate links, which means I may receive a percentage if you make a purchase using these links. This won't cost anything extra to you. I only link to things I like and use, and the proceeds help me to run this blog. Thank you for supporting me!
Materials used:
- Layla Bag Pattern by Etsy seller IThinkSewBags
- 1/2 yard leather
- 1/2 yard lining fabric
- Closed Bottom Zipper, 9", Cloister Brown
- Eyelet Punch Set + 20 Sets Eyelet with Washer 12mm
- Bronze Double Cap Rivets 10mm Pack of 60 Sets
- Snap Clasp Hook for Strap Pack of 8
- Jean-a-ma-jig
- Leather Sewing Machine Needles-Size 16/100 5/Pkg
- 50pcs Quilt Binding Clips
- A roller foot or teflon foot (I used the ones from this set of 32 presser feet
)
Some Tips for Sewing with Leather
Leather has a tendency to stick to metal presser feet, so a lot of people recommend using either a roller foot or a teflon foot (or sometimes a walking foot--I didn't test this one, so I can't say whether it works well or not) to help the leather feed more smoothly.
I found that the roller foot worked the best, but that this particular presser foot was a little more bulky than the teflon foot, and it was more difficult to guide the leather precisely. I ended up using the teflon foot for the majority of this bag.
In the set of presser feet I recommended above, you'll get both the roller foot (leftmost presser foot in the second row from the top) and the teflon foot (third from the right in the second row from the bottom and also the only white presser foot).
Be sure to use a leather needle in your sewing machine (it has a special wedge-like shape to punch through the leather more easily). Increase your stitch length and loosen your tension for best results. I found that 3.5 worked well for a stitch length, and that -.5 worked well for thread tension. Test your stitching on a scrap of leather before beginning your project to find the best settings for your machine and your particular leather.
My sewing machine was mostly okay with 3-4 layers of leather, but when it came to 5-6 layers, I started to run into trouble. Using a jean-a-ma-jig can help you to sew over uneven seams more smoothly. It's difficult for a regular home sewing machine to climb these mountains and come back down without skipping stitches. Seen below, the jean-a-ma-jig props up your presser foot so it can sew right through these bulky seams without having to drastically change height. (Side note: I'm using a regular presser foot here because I'm sewing over the lining fabric, rather than the leather.)
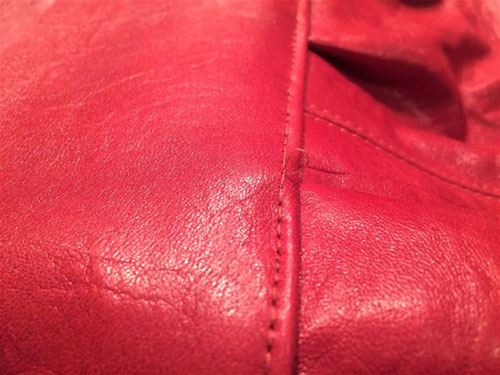
Despite my best efforts, however, there were some areas where my machine skipped stitches. Below, you can see several missed stitches in the middle of this row.
You can hand sew through these missed stitches to camouflage them. I sewed through the wrong side, over the line of stitching, and back down through. This creates a little loop over the line of thread, cinching it in where the stitch didn't catch.
Finally, use quilt clips instead of pins, so you don't leave holes in the leather. Any time you put a hole in leather, it's permanent. Below, I'm using quilt clips to hold the pleats in my leather before I sew them in place.
Layla Bag Pattern Review
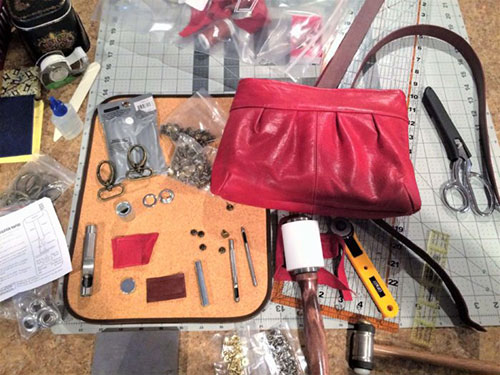
Overall, the pattern was well written and easy to follow. Here's a shot with all of the pieces and hardware you need:
I believe I made a mistake with the zipper, however. The pattern didn't indicate which way the zipper tabs should face when sewing the whole bag together, and I chose to fold the tabs toward the bottom of the bag. This didn't sit very well in the bag, however, and I think I should have actually folded the tabs toward the top of the bag instead. One other zipper tip: leave it unzipped when sewing the lining to the bag. You'll need to turn the bag through that opening.
I put the lobster clasp straight through grommet instead of using the gate ring recommended in pattern. This worked fine with the oblong lobster clasps I used, but might be more difficult with round lobster claw clasps.
I'd probably blow up the pattern a bit if I made it again. It's a functional size, but personally, I'd like it to be a bit bigger. Overall, it's a cute bag that sews up pretty quickly and looks great! I'm sure I'll make another one soon.


