21 Lessons Learned during My First Year Sewing
Last year I impulse-bought a sewing machine on Amazon because it was a daily deal. While I had occasionally used other people's sewing machines, I'd never had one of my own. I had done some sewing and embroidery by hand previously, but other than that, I had little sewing experience. I felt really lost at first, and I made a lot of fabric monstrosities. I still make fabric monstrosities sometimes, but I have learned a few things in my first year of sewing.
Here are some of the most important lessons I picked up in my first year of sewing. This isn't an exhaustive list, but these are some of the things that I struggled with or that confused me at first. These tips and tricks should help a beginner who is just learning to sew.
Lessons Learned
1. When something goes wrong, check the bobbin. Even if you don't think it's the bobbin, it's probably the bobbin. Despite successfully installing my bobbin dozens of times, every once in a while, I put it in backwards. In other instances, the thread may not be fully in the thread path. Open up the bobbin compartment, take it out, put it back in. Try again. Re-threading the top thread also solves a lot of issues.
2. While we're on the topic of bobbins, fill more than one at a time. Your future self will thank you, even though your present self is impatient to get back to sewing.
3. Only use the type of bobbin that your machine came with, even if other sizes seem to fit okay. Don't buy pre-filled bobbins unless you're sure they're the right size. Only use plastic bobbins if your machine came with plastic bobbins. Sometimes there are magnetic mechanisms in your machine (especially if it's computerized), which can be thrown off by a metal bobbin.
4. Keep the presser foot up while threading your machine. Lowering the presser foot engages the thread tension mechanism. You want this un-engaged while threading your sewing machine.
5. Hold onto your thread tails when you first begin sewing. Your thread may tangle and catch otherwise, creating a bird's nest underneath the fabric.
6. Read your sewing machine manual more than once. You won't remember it all the first time. I find something new and helpful every time I go back to my manual. You might even want to jot down some notes and photocopy important pages. I keep the sewing machine maintenance pages on the wall by my sewing machine. Needless to say, follow the instructions for cleaning/oiling your machine.
7. Be careful when buying sewing supplies online. You can find some good bargains, but you can also get ripped off. Price-wise, if it seems way too good to be true, it probably is, especially if it's coming from China. Brand name items are sometimes counterfeit or otherwise not-as-advertised. This presser foot was advertised as Singer brand. Be wary of large quantities and/or super low prices. I bought a package of 100 bobbins that were clearly not the right size (which can cause problems with your machine), and I recently got some questionable "Olfa" brand rotary blades. All of these came from Amazon and had reasonably good reviews. In all cases, the steep difference in price when compared with other sellers should have tipped me off.
8. Get some cheap fabric to practice on. You'll be sad if you ruin nice fabric that you paid good money for.
9. Buy good thread. Your machine and your projects will thank you. Cheap thread is linty, which can build up in your machine, and it's usually not as durable. Get some Gutermann Sew All or Coats and Clark Dual Duty. Buy it at wawak.com--they have excellent prices on thread.
10. Use cross wound thread on a horizontal spool pin and stacked thread on a vertical spool pin. Use a spool cap when your manual calls for it.
11. When changing your thread, clip it close to the spool and pull it down the thread path it normally travels toward the needle. The thread is not meant to travel backwards through this path, so don't just pick up your spool and yank the thread out the top of the machine.
12. As tempting as it is, don't use vintage thread. It's just not strong enough.
13. Use Schmetz needles. They're well-made and consistent in size. With other brands, I've found slight variations in size/quality.
14. Change your needle more often than you think you need to. Change it every 4-6 hours of sewing, depending on what you're sewing. A dull needle can ruin your project.
15. Use the hand wheel to sew tricky bits manually. You'll have more control this way and can avoid making mistakes. It's easy to overshoot with the foot pedal, especially when sewing something that requires a little finesse.
16. Don't turn the handwheel toward you--only turn it away from you. This may vary depending on your particular machine, but my manual cautions against this several times. (Edit: don't listen to me. My modern sewing machine manual actually says to turn it toward you, not away from you, but one of my vintage machines says the opposite. Go with that your manual says--it may vary.)
17. After changing your presser foot, sew manually with the handwheel for a few stitches. Some presser feet require a particular stitch (e.g., the overlock foot shown below needs to have a zigzag stitch used with it--a straight stitch will hit that bar in the middle). If you haven't set your machine to the right stitch, your needle will slam into the presser foot, which is bad. Breaking your needle can send metal shards flying, and it can also throw off the timing of your machine.
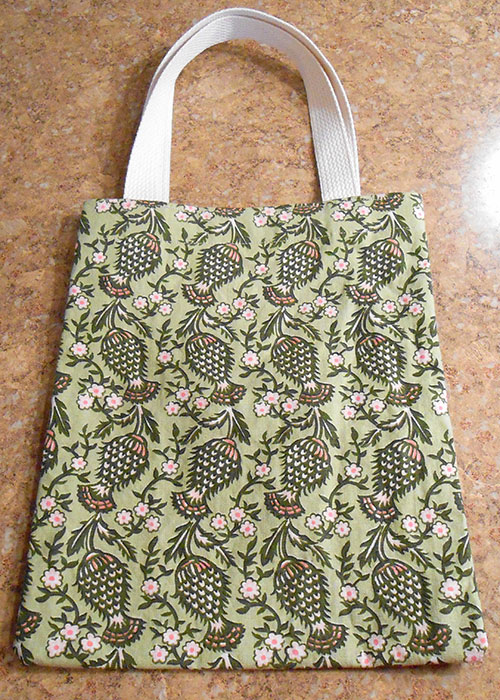
18. Start with a super easy beginner project. Even patterns that claim to be "easy" and "for beginners" often require a fair amount of background knowledge. Reading a pattern takes a little getting used to, and easy patterns may still require mastery of a number of basic sewing skills. Make something with a couple of pieces of fabric and only straight lines. I made this bag from Needle and Spatula as my first project. It's nice to have a project you can finish in one sitting and use afterward.
19. Commercial patterns (e.g., Simplicity, McCall's, Vogue, Kwik Sew, etc.) often come in a couple of size ranges. Be sure to check the sizing, so that you buy the right range. For example, in the patterns below, the one on the left is for sizes 14-22, while the one on the right is for sizes 6-12. The back of the envelope will provide measurements that correspond to each size. Sometimes your "pattern size" will not be the same as the size you wear in off-the-rack clothes. Go with the size indicated by your measurements.
20. A yard is 36" of fabric lengthwise. The width of fabric differs, however, ranging from around 40"-60". Most fabric comes in two common sizes: 45" and 60." You can find the width noted on the end of the bolt of fabric (if buying in person) or in the fabric description (if buying online). The amount of fabric you need to buy for a project will depend upon how wide the fabric is. On most pattern envelopes, the amount of fabric needed is noted for both 45" fabric and 60" fabric.
21. When a pattern mentions the grainline, it means the line that runs parallel to the selvage (pronounced "salvage"). When fabric comes off the roll or bolt, the top and bottom edge will probably be white and may have information about the fabric printed on it. These edges are the selvage.
Most patterns will include a long arrow labeled "Grainline." Align this so that it is parallel with the selvage (I should have tilted my pattern piece slightly to the left here). If you don't pay attention to grainlines, you may end up with something wonky, stretched, or with a seam that won't stop puckering. See a more detailed discussion of grainlines here.
I hope these tips are helpful! See also my post on Sewing Tools That Make Your Life Easier and Lessons Learned in my 2nd Year Sewing. Let me know if there's anything important I left out.


