Grainlines and Sewing: Everything You Ever Wanted to Know

Grainlines and sewing
When I first started sewing, I had trouble remembering which way my pattern pieces were supposed to go on the fabric, where the grainline was, and which side had the selvedge. For the first pattern I sewed, I didn’t even realize that the pattern pieces needed to be oriented a certain way on the fabric (see the lessons I learned in my first year sewing for more helpful tips)! If you’re in the same boat, you might be struggling to understand these things, too. Read on because all of this will become much clearer to you over the course of this post.
Disclosure: This post contains affiliate links, which means I may receive a percentage if you make a purchase using these links. This won’t cost anything extra to you. See my privacy policy for more details.
When I started weaving my own fabric, grainlines all started to make more sense. All of the rules that I’d followed without understanding why clicked into place, and I didn’t have to Google which way my pieces were supposed to go every time I cut out a new pattern.
To make this easier, let’s start with some terminology. I’ll keep it to a minimum, but these are terms that it really does help to know. I’m including an image of my rigid heddle loom to illustrate these terms.
The warp threads run lengthwise up and down the loom (see the gray yarn below). They’re under a decent amount of tension, so when you raise and lower some of them, you get a nice, open space between the threads, through which you can pass your shuttle with the weft thread (see the blue/green yarn below). The weft threads run back and forth, perpendicular to the warp threads.
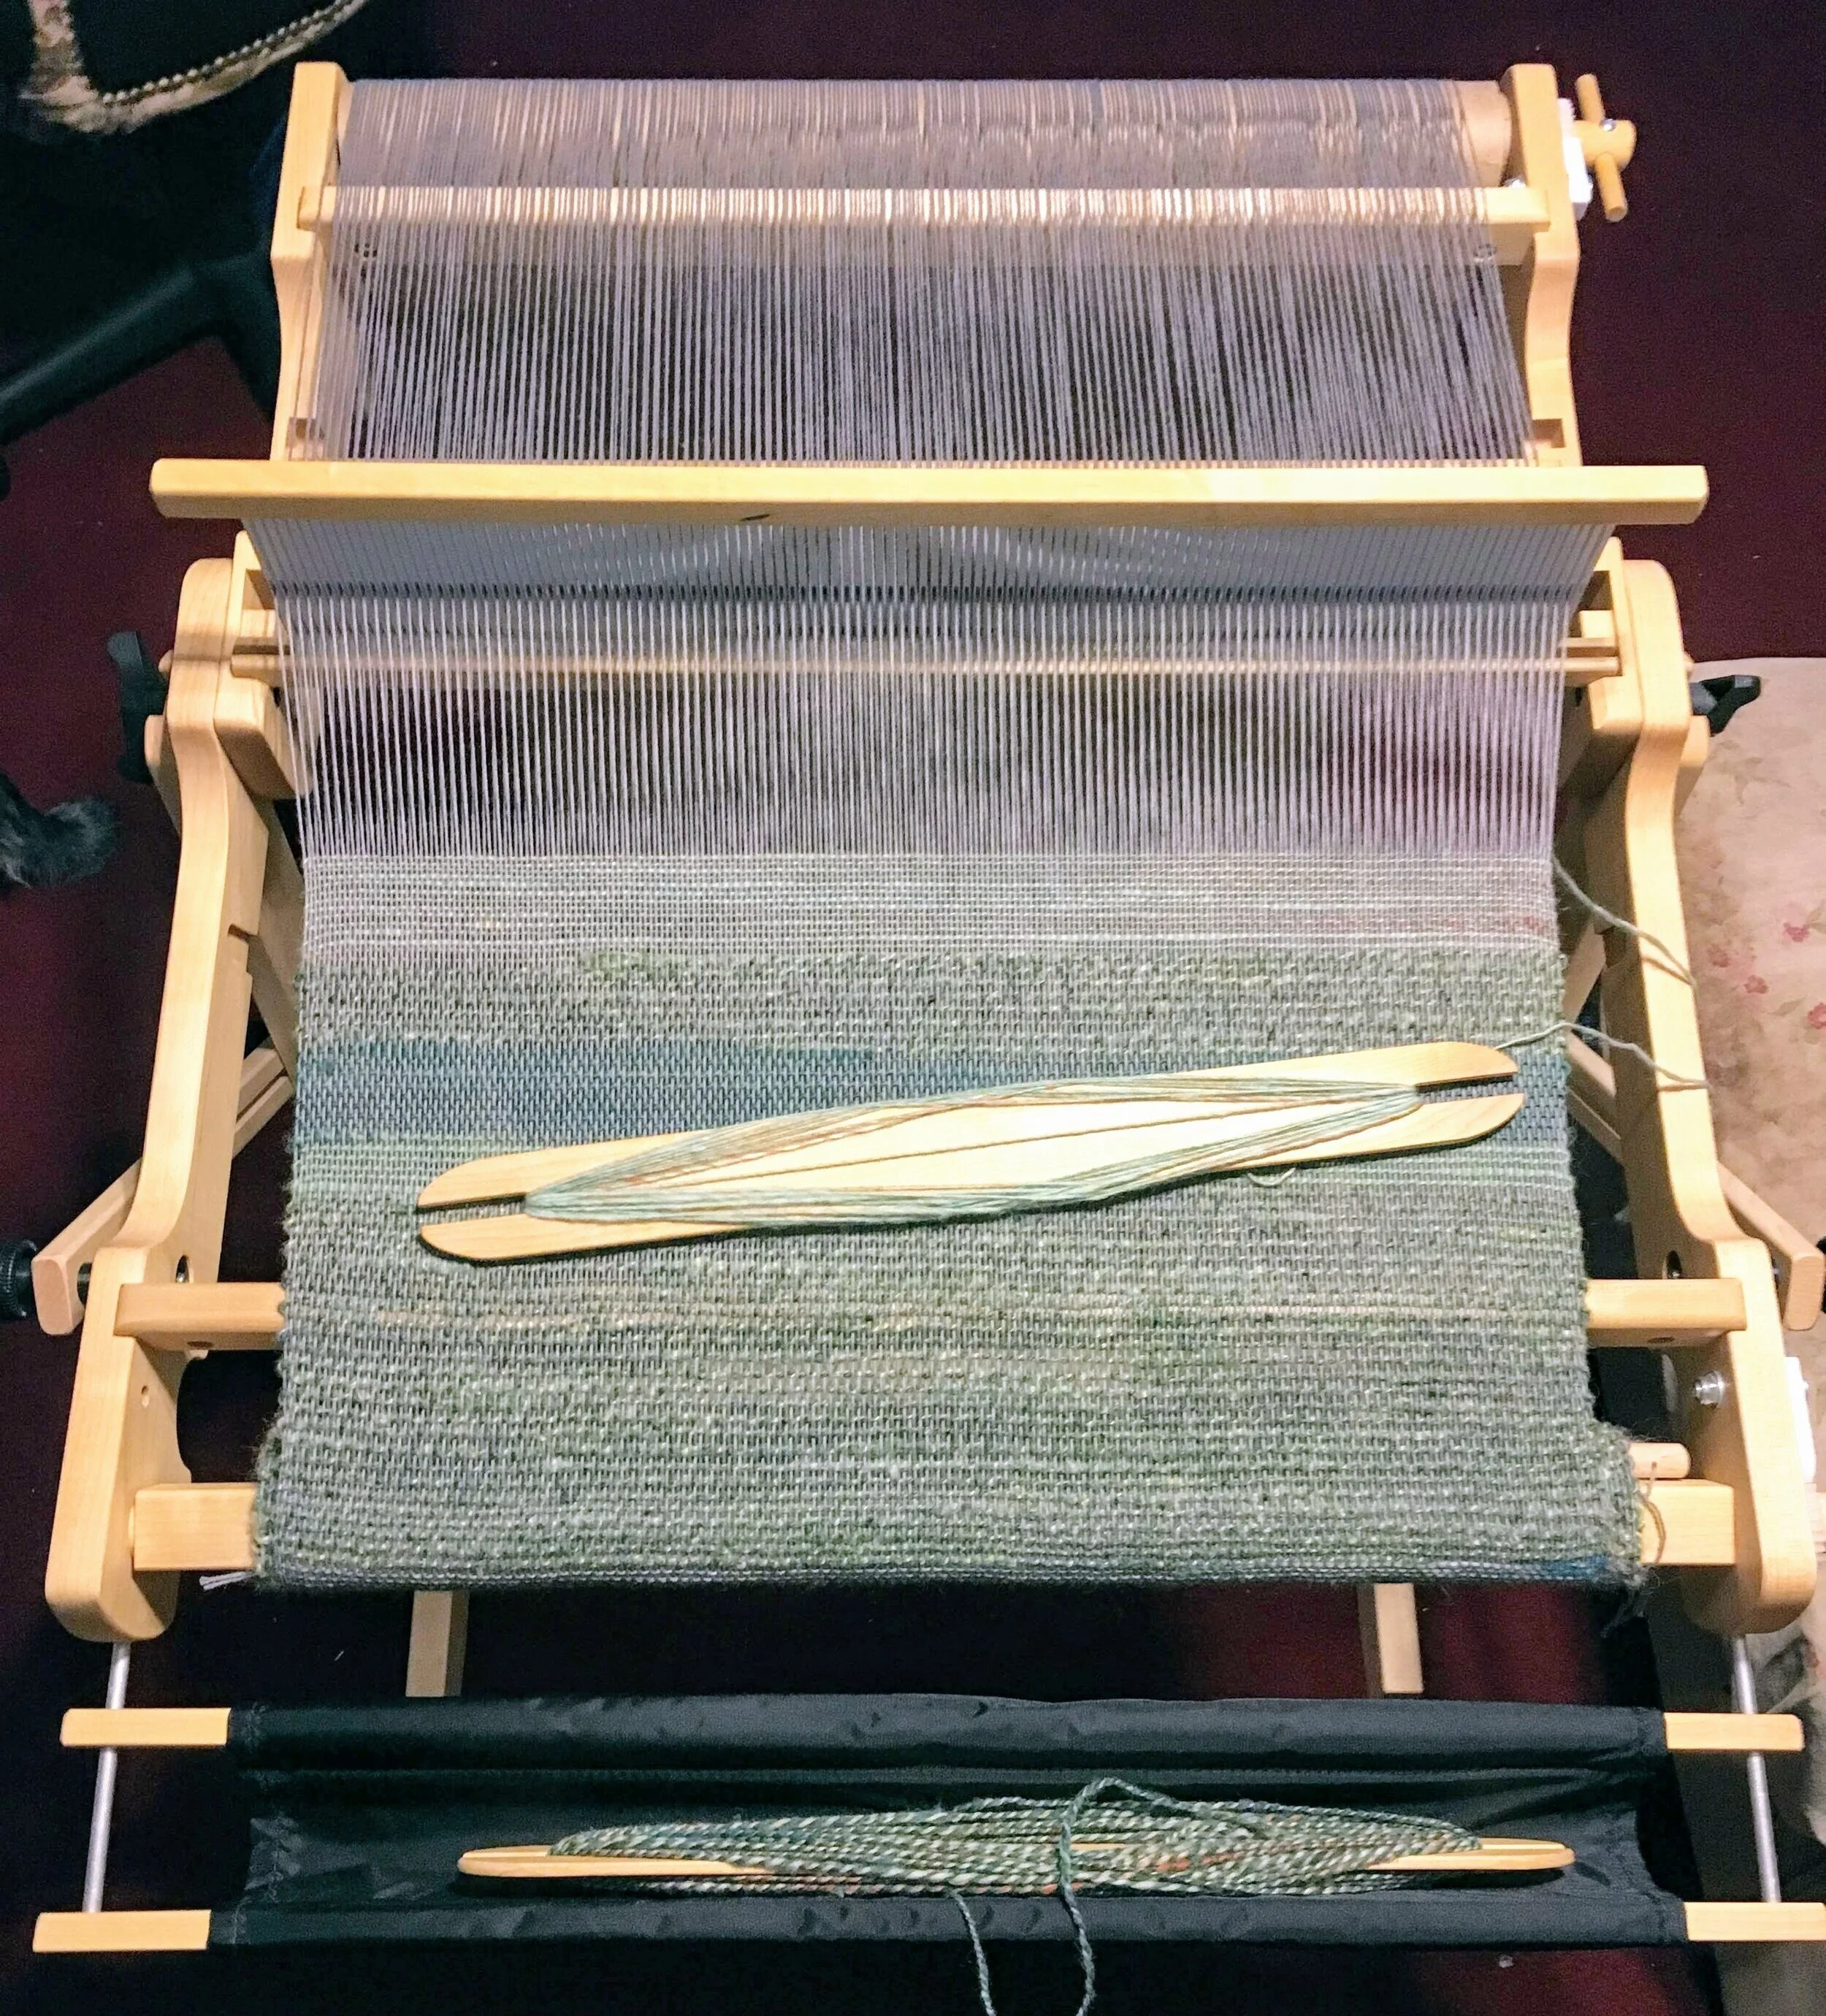
Warp and weft on a rigid heddle loom
To weave, you pass a weft thread through the opening to the other side of the warp threads, raise a different set of warp threads, and then pass the shuttle back through the other way, making sure to wrap the weft around the last warp thread on either side. See this process illustrated on my Leclerc Artisat floor loom below.
As noted above, the warp threads have to be under tension, or you won’t be able to raise different sets of them and get a clean opening through which to pass the weft.
Because you wrap the weft around the last warp thread each time you go back and forth, the sides of the weaving will not unravel. The term selvedge refers to the self-finished edge of a woven fabric. You may see this spelled either selvage or selvedge. I prefer selvedge because, well, it’s on the edge of the fabric. Wikipedia backs me up on this, saying that “the terms selvage and selvedge are a corruption of ‘self-edge.’” Just to be extra confusing, though, it’s pronounced “salvage.”
The selvedge is important when you’re sewing with commercially woven fabric because, once it’s not on the loom anymore, it can be difficult to identify where the warp and weft threads are. But once you know where the selvedge is, you know that the warp threads run parallel to this edge.
In the examples below, the selvedge can be found along the lefthand side of each piece of fabric. The green and peach floral fabrics are commercially woven, and the one on the left is handwoven—it’s actually the same one you saw on the rigid heddle loom above. When you cut fabric, you’ll notice that the selvedge doesn’t unravel, but any other edge of the fabric will. This is because those warp threads on the edge of the fabric are wrapped by the weft threads, which go back and forth, as seen above.

Selvedges on commercially woven fabric and handwoven fabric
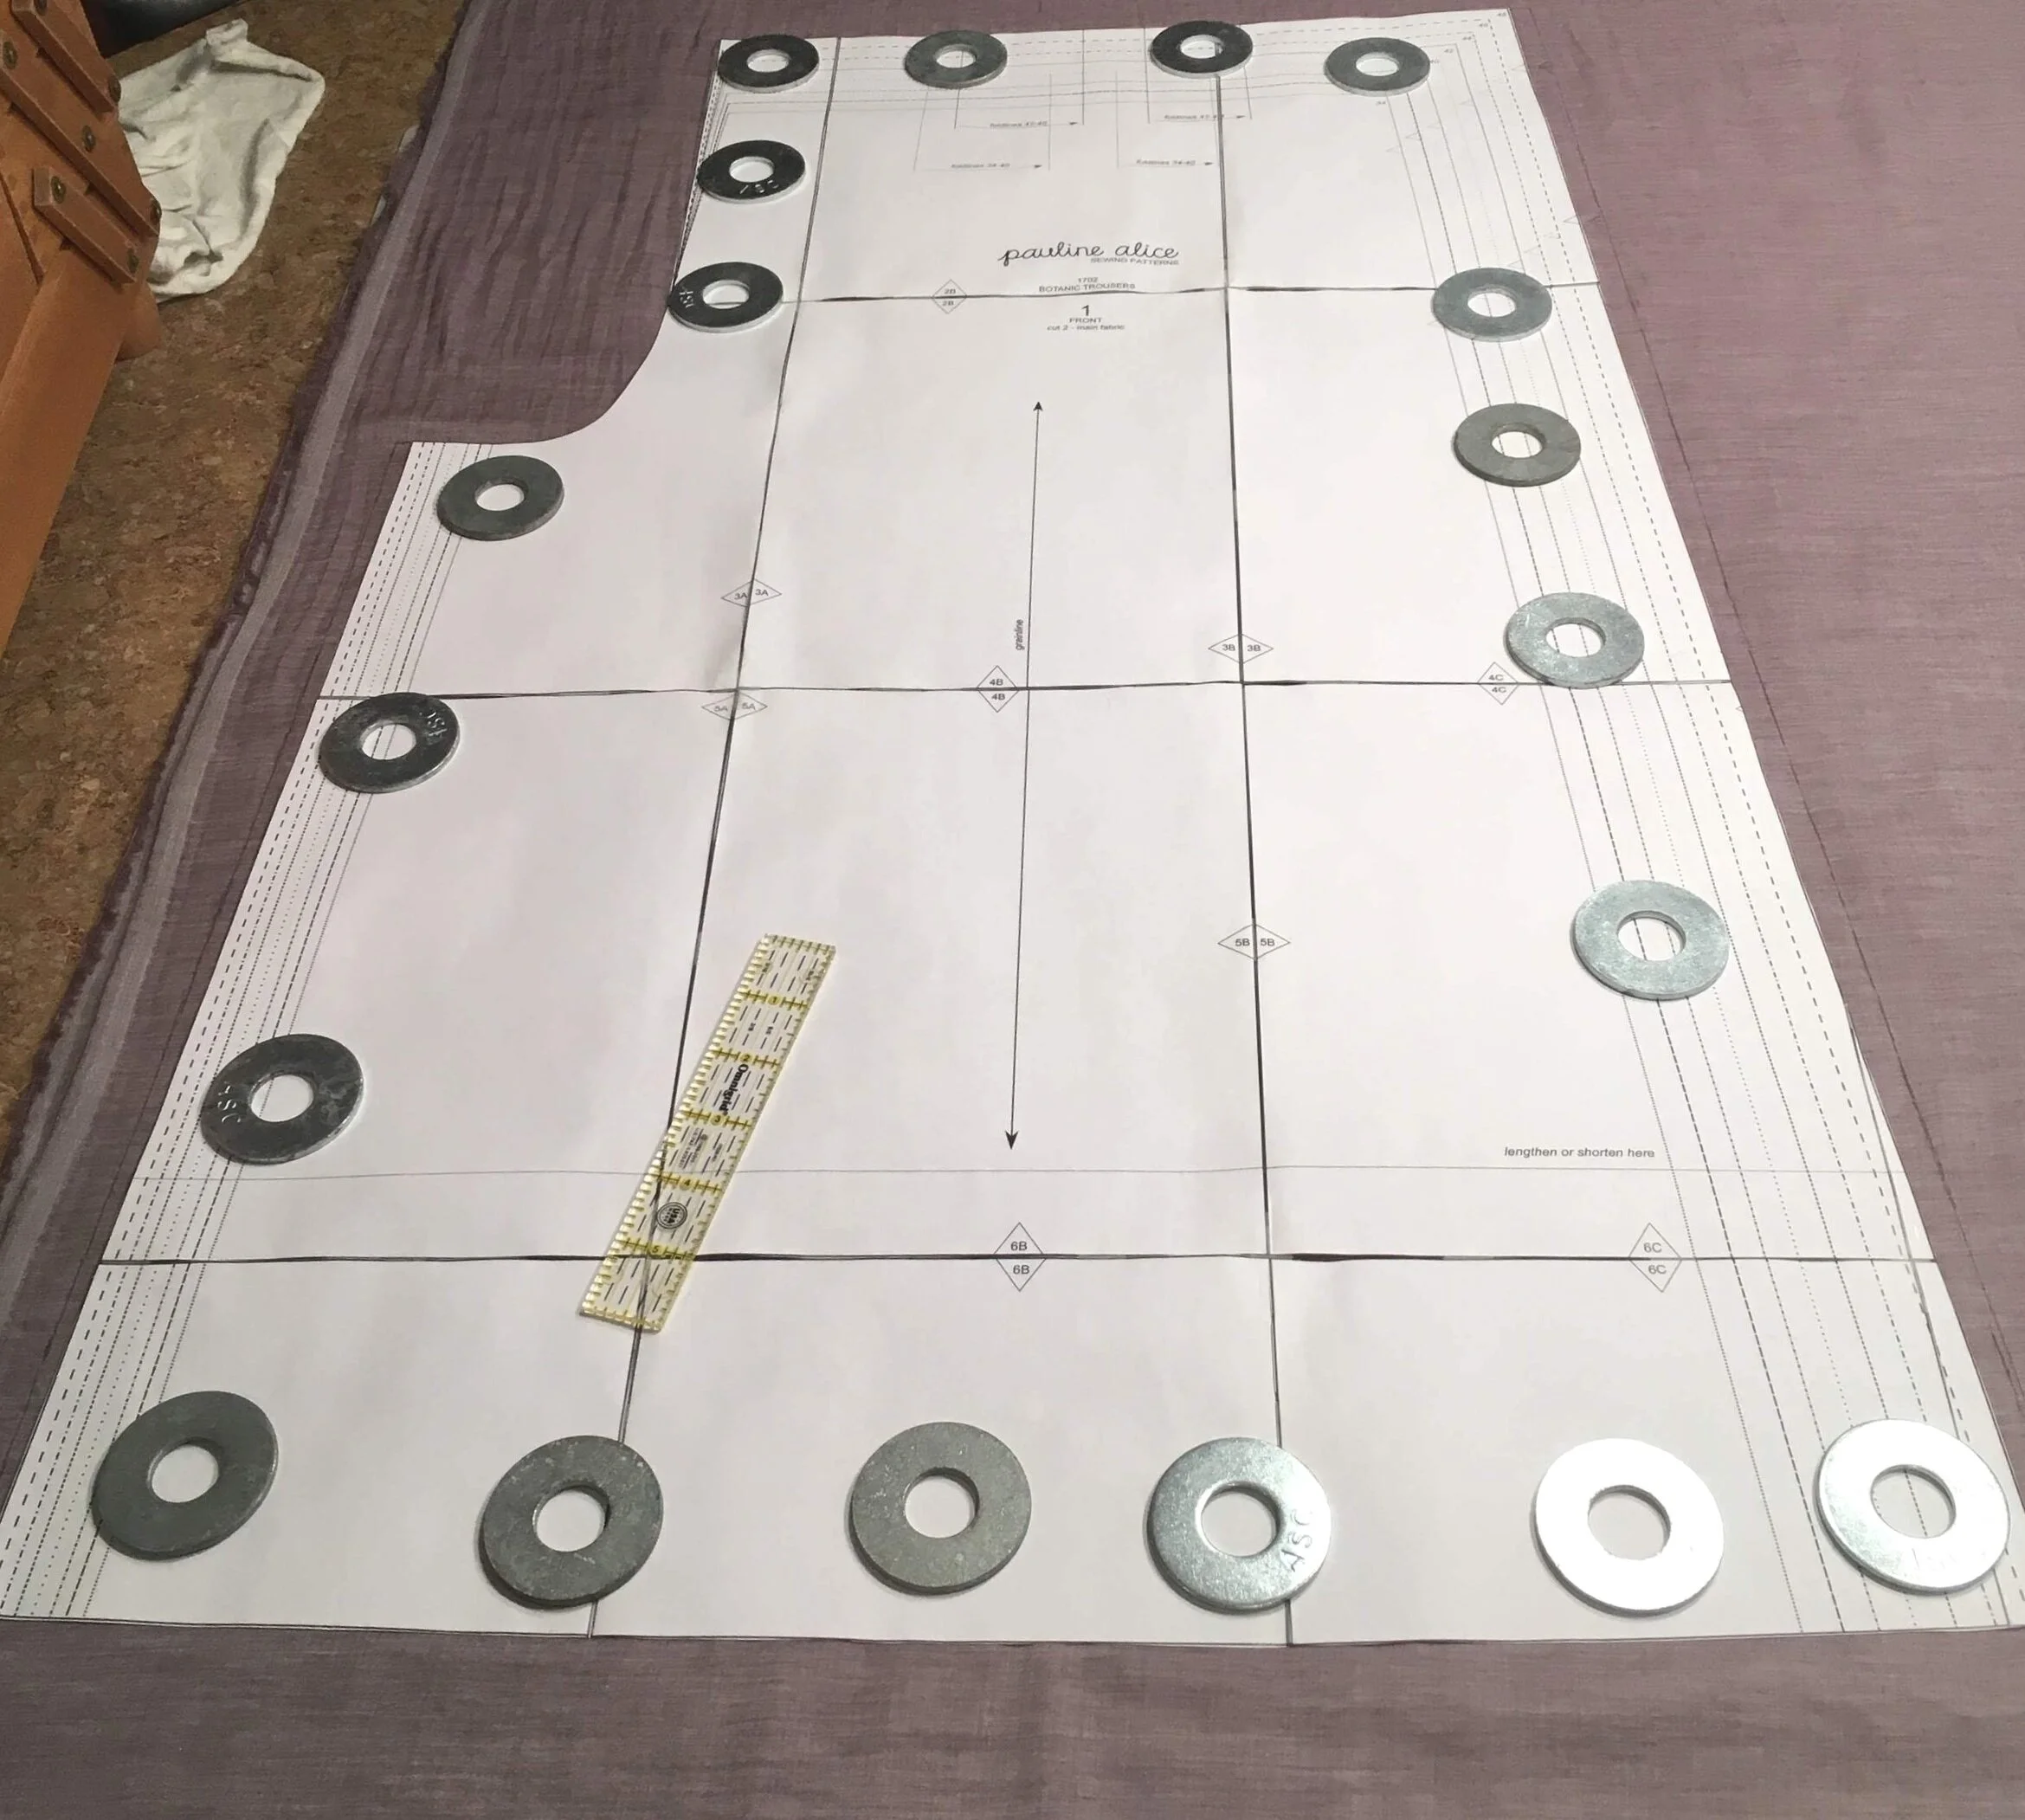
With most sewing patterns, you’ll need to align your pattern pieces with the grainline. You’ll see a long arrow along the middle of the pattern piece to indicate how you should place the pattern piece on your fabric. The arrow is in the middle two squares of this pattern piece, and you can see how this line is parallel to the selvedge, which runs along the lefthand side of the fabric as shown below.
Now what is the grainline? Well, technically, there are two grainlines on your fabric, the lengthwise grainline and the crosswise grainline. The lengthwise grainline lines up with your warp threads and runs parallel to the selvedge. The crosswise grainline lines up with your weft threads and runs perpendicular to the selvedge.

Warp, weft, grainlines and selvedge on woven fabric
When your sewing pattern tells you to align pieces with the grainline, they mean the lengthwise grainline. So place your pattern piece so that the long arrow is parallel to the selvedge, as shown above.
Now you might be wondering why you need to do this. Couldn’t you cut your pattern more efficiently and with less waste if you could just put your pieces down any which way?
Well, you could do this, but your piece of fabric likely wouldn’t fit together the way you want them to. Remember how I said that the warp threads are under more tension than the weft threads? That holds true even when the fabric is off the loom. The way that your pattern pieces should be oriented on your fabric means that most of your seams will be sewn along the lengthwise grainline, which means you’re sewing your seams alongside the warp threads.
The weft threads, in contrast, are under less tension, so if you sew a seam across the crosswise grainline of the fabric, you may see more puckering or rippling of the fabric.
And if you sew a seam that’s not directly along the lengthwise or crosswise grainlines, your fabric may stretch even more. That’s why your sewing patterns will likely recommend stay-stitching necklines, as I did with the one shown below, and other areas that have curved seams, such as the bust.

Dress with curved seams at neckline and bust
Stay-stitching simply means running a line of stitches close to the edge of the fabric and within the seam line for the garment. It will not be visible in the finished piece, but it will keep the fabric from getting stretched out of shape between the time you cut it and the time you finish sewing it. Even handling fabric can cause the shape to become distorted.
Even though woven fabrics are not necessarily meant to be stretchy, sometimes they are cut along the bias, or at a 45 degree angle which bisects the warp and weft threads. This cut will give you the most stretch that a woven fabric can have.

Warp, weft, bias, grainlines, and selvedge
You may have come across bias binding before, and this is a type of edge finishing that uses thin strips cut along the bias of a woven fabric. It’s not super stretchy, but it has a certain amount of give to it, and it can be used for all sorts of projects including irregular shapes and curves, such as the binding the edge of the pocket shown below.
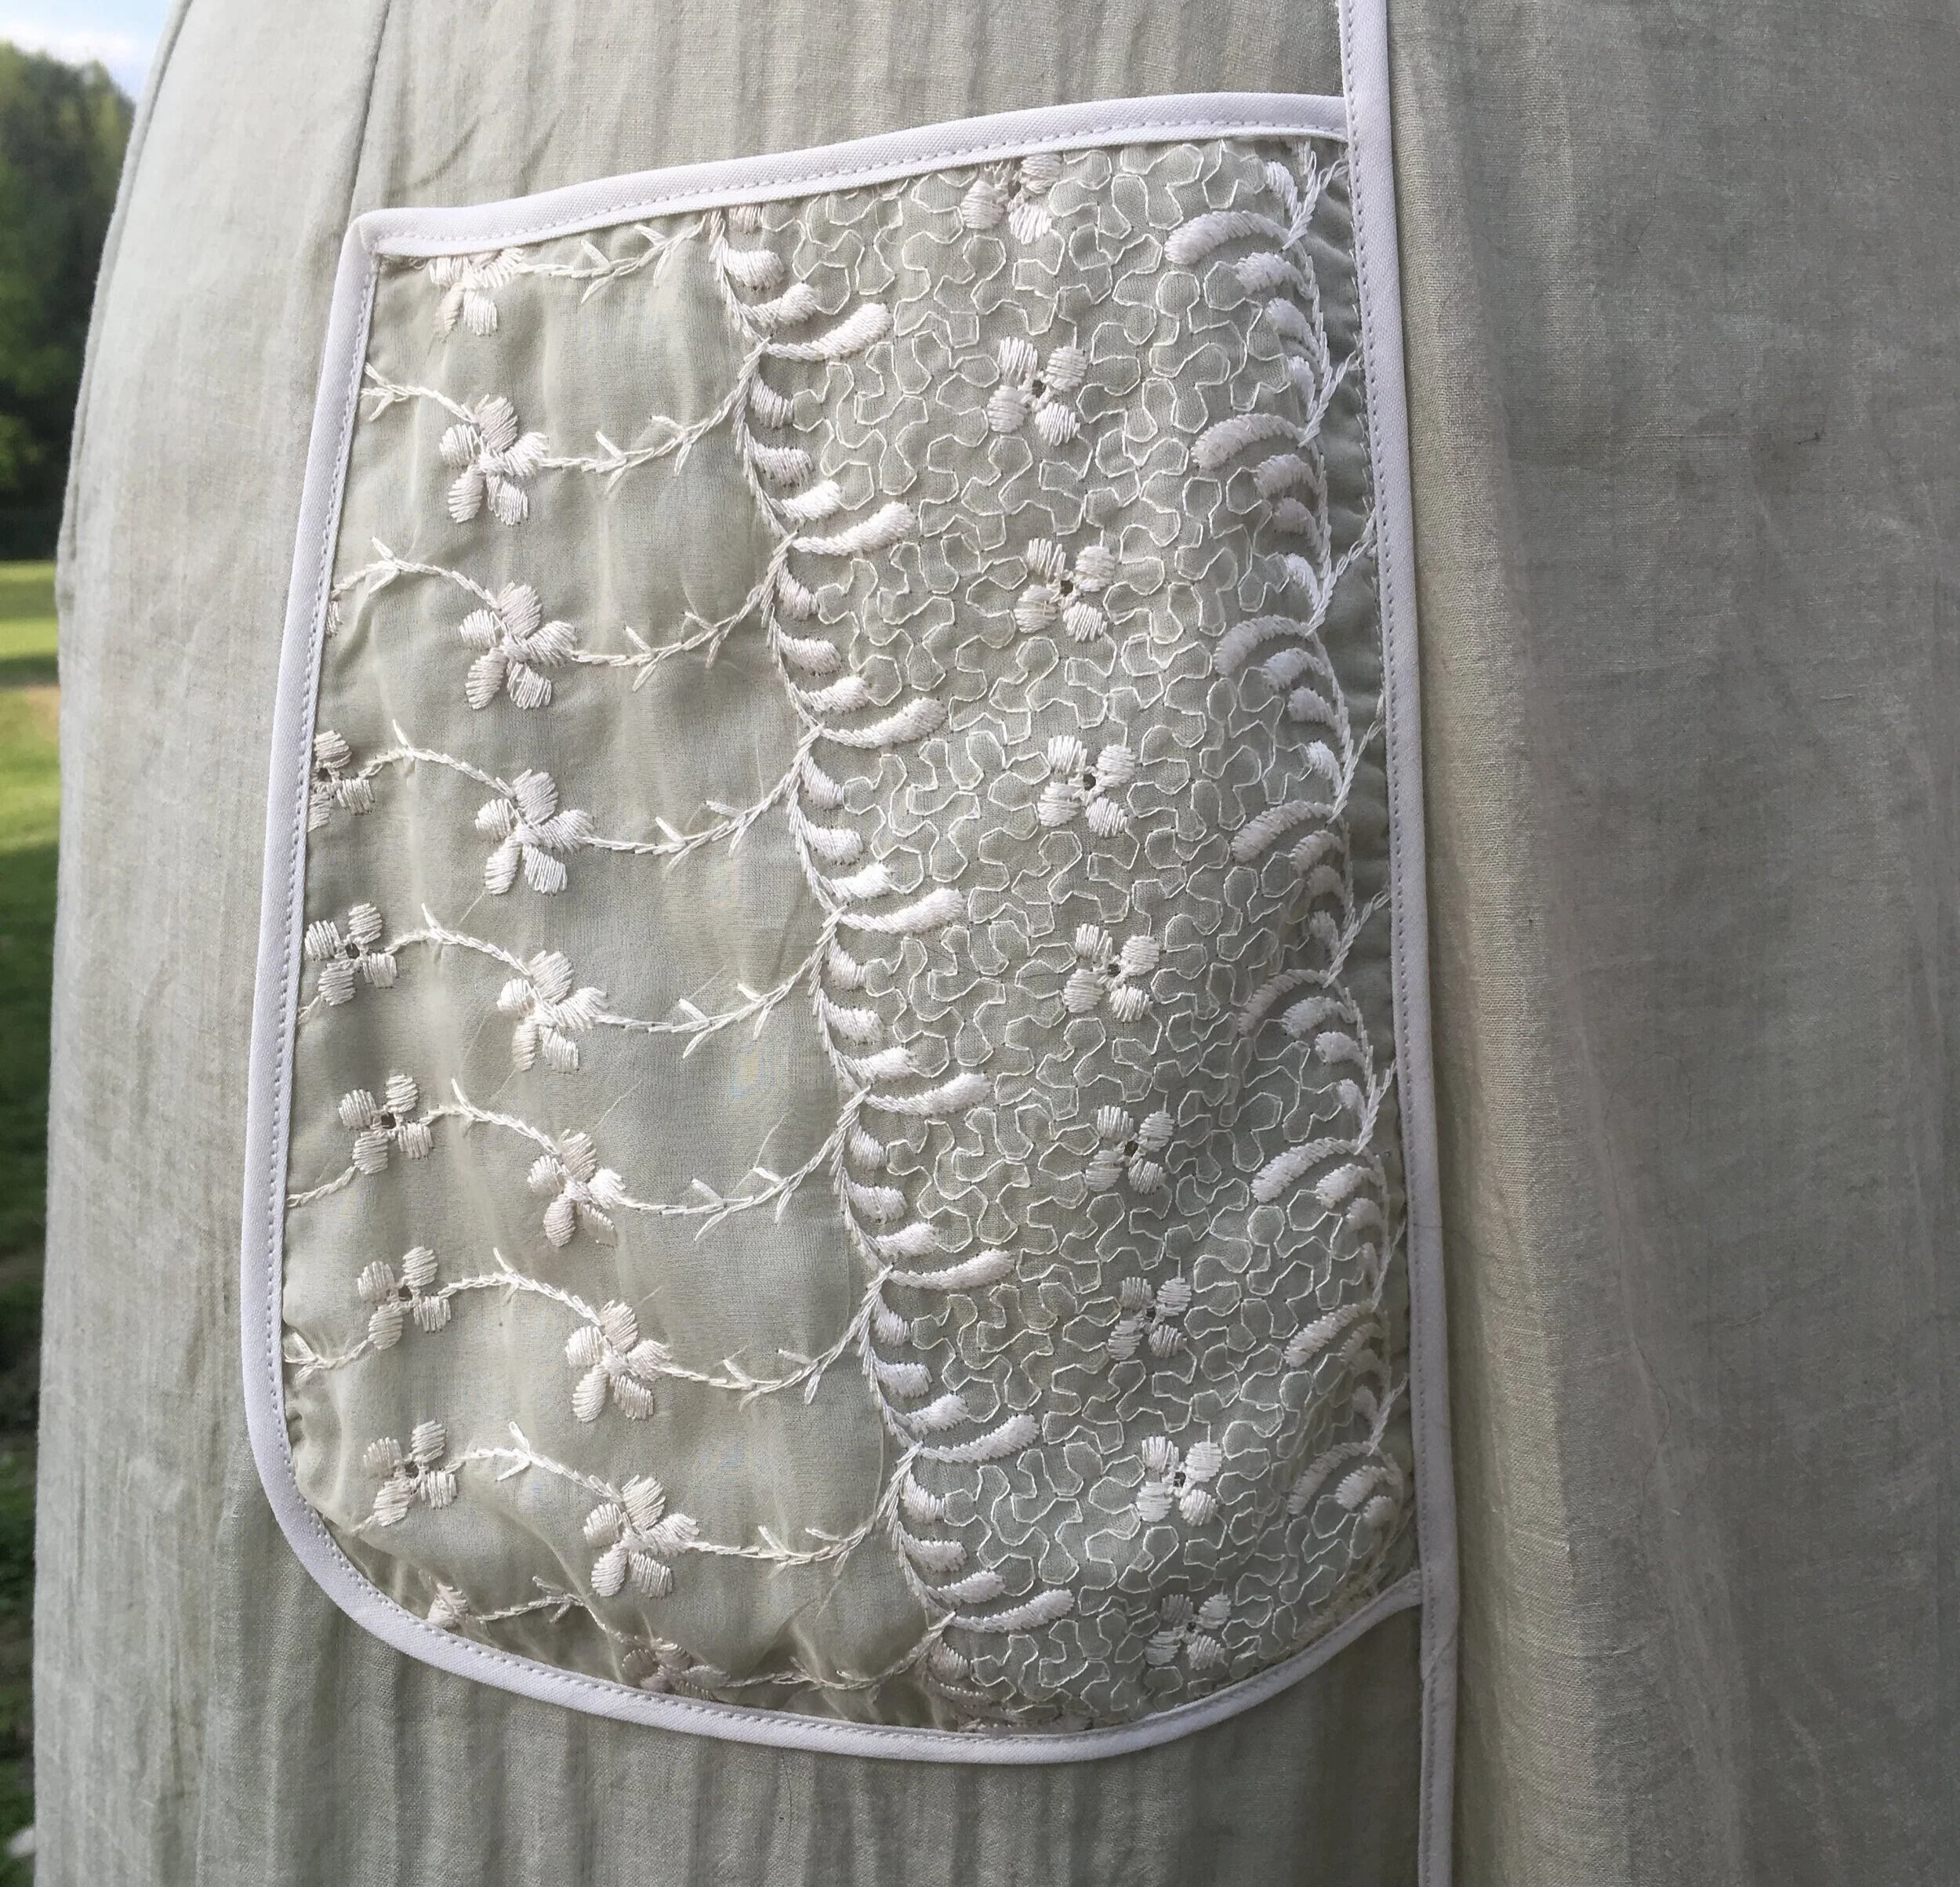
Bias tape binding on a curved pocket
Now, what if you have a piece of woven fabric which has been cut and/or doesn’t have an obvious selvedge? How can you determine the correct lengthwise grainline for seams? It’s not a foolproof method, but I’ve found that trying to stretch the fabric along both grainlines will help. You should find that one direction stretches a little bit more than the other, although neither will be particularly stretchy.
Try this method on a piece of fabric that still has its selvedge, so you can get a sense of what it should feel like when you try to stretch the fabric along the lengthwise grain as opposed to the crosswise grain. The crosswise grain should have a little bit more give than the lengthwise grain, and you should now be able to recognize that in fabric that doesn’t have a selvedge.
I hope that this helps to clear up some of the mystery surrounding grainlines, what they are, and what you should know about them for sewing. Knowing a little bit more about the process of how fabric is woven will make it easier to remember why you cut along a certain side of the fabric, so just keep that weaving process in mind when you’re trying to remember how to orient your pattern pieces for sewing.

Grainlines and sewing