Singer 281 Motor Replacement: Clutch to Servo

In this post, I'll show you how to replace a noisy, overpowered clutch motor with a more responsive servo motor on your industrial sewing machine. I'm using a Singer 281-1 here, but the setup of most industrial sewing machines is quite similar. Initially, I thought this was going to be a lot more difficult than it was. Replacing a motor is actually pretty simple on an industrial sewing machine!
Disclosure: This post contains affiliate links, which means I may receive a percentage if you make a purchase using these links. This won’t cost anything extra to you. I only link to things I like and use, and the proceeds help me to run this blog. Thank you for supporting me!
Materials used:
- Sailrite Workhorse Industrial Sewing Machine Servo Motor (110V)
- Basic tools, such as screwdrivers, wrenches, and a ratchet and socket set.
Why You Need to Change the Motor
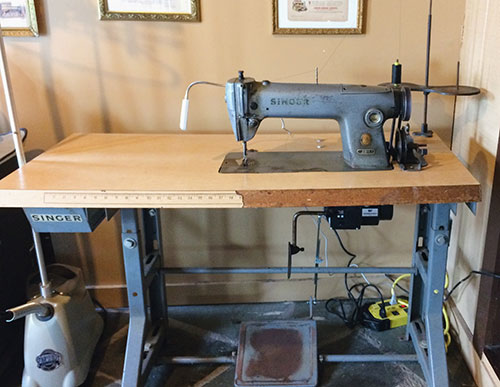
My Singer 281-1 came with a 380 volt, three phase clutch motor. Basically, this motor was rated for an industrial space with a much beefier electrical capacity than your average home has. This sewing machine was previously used in a factory, so it's no surprise that this was the case. If you're interested in learning more about the differences in electrical capacity between homes and commercial/industrial settings, check out Fashion Incubator's post on this very subject.
When first researching the Singer 281-1, I found that many people recommended replacing the motor for home use. There were some who suggested modification or rewiring, but I didn't feel like I had the expertise to do that.

Not only was I wary of the voltage on the clutch motor, but clutch motors are notoriously difficult for beginners, they use more electricity because they're always running, and it's more difficult to control your speed. The Sailrite servo motor is 110 volts (vs. 380 for the clutch), which is appropriate for home use in the United States. And it's still a lot more powerful than your average domestic sewing machine motor.
Why This Motor?
I'll start by saying that there are a few cheaper options on Amazon for industrial sewing machine motors. However, Sailrite has a reputation for excellent customer service and high quality products. I had never replaced a motor before, and I wanted to know that I could call someone knowledgeable and ask for help if I needed it.
Fortunately, the instructions and videos provided by Sailrite made it easy to understand how to install the motor. From what others have written in their reviews, most of the cheaper motors on Amazon do not come with instructions.
There aren't any reviews of this motor on Amazon, but there are 10 reviews on the motor's product page at Sailrite, and they're all five stars! You can buy this motor directly from Sailrite, too. I like buying through Amazon because one of my credit cards allows me to use points to buy stuff on Amazon, so I only paid $15 for this motor. Always nice to get a bargain!
Singer 281 Motor Replacement
You can find pdf instructions for installing the motor here. I mostly used the videos on Sailrite's Youtube page, rather than the paper instructions, because it was easier to see what you needed to do for each step.
See videos:
- Step-By-Step Video on How to Attach Pulley
- How to Replace a Clutch Motor with Workhorse Servo Motor Video
It helps to have a second person, especially when you're attaching and positioning the motor to your table. You could also tip your sewing table onto its side to install the motor, which is what I did to remove the old motor. However, in order to align the your belt with the pulley on the motor, it helps to have the table upright with the sewing machine in place.
Detaching the Old Motor
First, you need to remove your old clutch motor. This was fairly easy--you just need to unscrew the three nuts holding the motor to the bolts on the underside of the table. Sailrite provided new bolts, but I ended up leaving the old ones in. You'll also have to unscrew the power button from the front of the table.

Attaching the Pulley
Next, you have to attach the pulley to the motor. For this machine, you'd use the silver pulley, rather than the cogged pulley. Follow the instructions in the video.

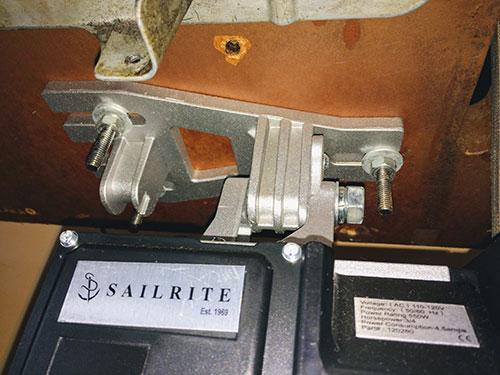
Attaching the New Motor to Your Table
Now you need to attach the new motor to the bolts on the underside of the table. You can see here that the Sailrite motor has adjustable tracks, so you can easily line up the pulley on the motor with the belt cutout on your table. Make sure the pulley is in line with the balance wheel on your sewing machine, too. Don't fully tighten the nuts until it's positioned correctly.
Attaching the Belt
To attach the belt, you'll have to tip your machine back until the belt can fit around the pulley. it should fit fairly snugly. You may or may not have to buy a new belt. My old 40" belt fit just fine! Then you'll put the pulley cover on the motor.

Attaching the Treadle Bar
I wasn't entirely sure how to attach the adjustable treadle rod to the motor and foot pedal, but it wasn't too difficult to figure out. Below, the image on the left shows the foot pedal at rest, and the image on the right shows the foot pedal depressed. The treadle rod attaches to a lever on the motor and also to the foot pedal. When the foot pedal is depressed, it pulls the rod and lever down to activate the motor.

Turning It On
When you switch it on, you'll see a P and a moving dash around the perimeter of the zero next to the P. I thought maybe something was wrong with my motor, but that's how it always looks when I turn it on. I think it's just the power indicator.

Features of the Sailrite Workhorse Motor
I'm impressed not only by how quickly it sews, but how slowly! I have way more control with this machine than I do with my regular domestic sewing machine. I can sew at a super slow snail pace or race through a seam! It has variable maximum speeds, which range from 400-3600 stitches per minute. Plus, you have 40 different maximum speeds to choose from.
For example, if you set your maximum speed to 400 stitches per minute (the slowest speed available), when you lightly tap the foot pedal, you'll be able to sew as slow as you want. Putting the pedal all the way down will bring you up to the maximum speed of 400 stitches per minute. The manual explains how to set the maximum speed.
Have you tried to replace a motor on an industrial sewing machine? How did it go?
More on the Singer 281-1
See my other post on restoring and sewing with the Singer 281-1.