Make an Easy Zipper Pouch

In this sewing tutorial, I'll show you how to make a quick and easy quilted zipper pouch or pencil case with a zippered top and an open pocket in the front. It's just the right size to carry your art supplies!
Disclosure: This post contains affiliate links, which means I may receive a percentage if you make a purchase using these links. This won't cost anything extra to you. I only link to things I like and use, and the proceeds help me to run this blog. Thank you for supporting me!
Materials used:
- 1/4 yard main fabric (you can use a fat quarter for this)
- 1/4 yard lining fabric (you can use a fat quarter for this)
- Small coordinating scraps for the pocket and pocket lining
- 1/4 yard medium weight fusible interfacing
- 9" zipper ( I used this selection of zippers--there are lots of different colors included: 54pcmix Nylon Coil Zippers 9 Inch
)
How to Create Zipper Tabs
You don't have to create these zipper tabs, but I think they look nicer than just sewing over the zipper itself and trimming it. My zipper was about 1" wide. I cut a strip of fabric 3" long and 1" wide. Line it up as shown below in the first picture. Fold down the long end closest to the zipper 1/4" and press (not shown below). You don't want this edge unraveling when you use the zipper. Fold in each side 1/2," as shown in the second picture. Then fold in each side 1/2" again, as shown in the third picture. Now put your zipper tab over your zipper (fourth picture). I overlapped the tab and the zipper about 1/2." Sew the tab to the zipper with two rows of stitches along each end of the tab.
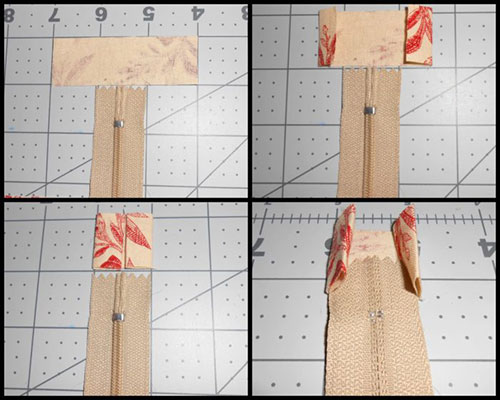
It should look like this when you're done.

Prepare your fabric
Here's all of the fabric you'll need to make this pencil case.
Cut
- 2 pieces for the main body of the bag: 9 1/2" x 6"
- 2 pieces for the lining: 9 1/2" x 6"
- 4 pieces of interfacing: 9" x 5 1/2"
- 4 pieces of coordinating fabric stripes: 7 1/2" x 1 1/2"
- 1 piece for the pocket lining: 7 1/2" x 4 1/2"
Fuse your interfacing to the main body of the pencil case and to the lining pieces.

Create a Quilted Pocket
Use 1/4" seams for all parts of this pencil case. Sew the four stripes together and press your seams flat.

Right sides together, line up the stripes and your pocket lining. Sew around, leaving an opening of about 1 1/2" (see bottom edge in photo below).

Turn your pocket right side out and press the raw edges inward until they're even with the rest of the pocket. Leave the opening as-is for now because you'll sew it closed in the next step.

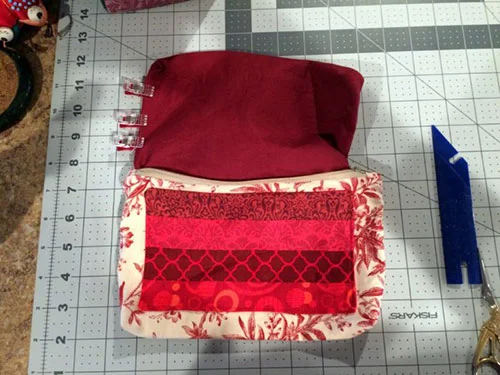
Take a body piece of the bag and line your pocket up evenly on it. I made some lines with a water-soluble fabric pen to note where I wanted it to go. Leave 1 1/4" on either side, 3/4" from the top, and 1 1/4" from the bottom. Sew around the pocket on three sides. If you left your opening at the bottom of the pocket, like I did, you'll now sew it shut as you attach the pocket.

Sewing the Body and Lining of the Pencil Case
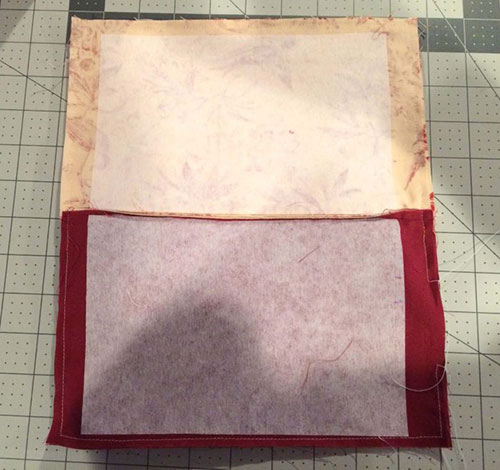
Now you'll attach the lining and body of the pencil case to the zipper. Take a body piece of the bag and lay it face up. Now take your zipper and lay it face down on that body piece. Take a piece of lining and lay it face down on the zipper. I've staggered the pieces below to show you the correct order, but you'll line up all of the edges. Basically, you're sandwiching the zipper between the body and lining pieces.

Sew all three pieces together along the top edge with a 1/4" seam.

Fold the body and lining away from the zipper. It should look like this.

Now you want to sandwich the other side of the zipper between the body and the lining. First, place your lining face up. Place your zipper face up on top of the lining. Lastly, place the body piece face down. Again, I've staggered the pieces so you can see the order, but you'll want to line up the edges evenly. Sew it all together and fold the body and lining away from the zipper again.

Now it should look like this. Optional step: topstitch on either side of the zipper to keep the fabric from folding in toward the zipper and getting caught.

Before you start the next step, open the zipper half way. If you don't do this, you won't be able to turn the bag once you've sewn the lining and body pieces together. Now fold your pencil case so that the body and lining pieces are right sides together. Fold your zipper tabs toward the body of the pencil case, rather than toward the lining.

Sew around the entire rectangle, starting halfway up the side of the lining. Leave an opening along the side of the lining to turn the bag. See the right side of the pencil case in the photo below.
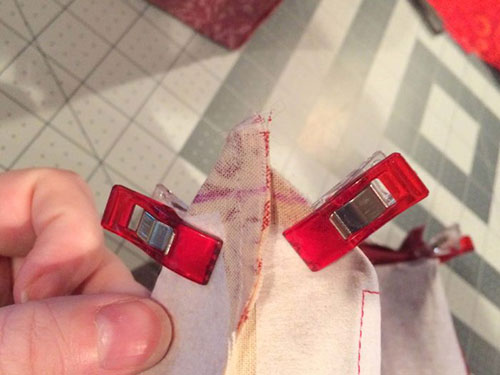
Boxing the Corners
Before you turn your bag right side out, you should box all of the corners by 1". Do this for the bottom of the lining and the bottom of the body, for a total of four boxed corners.

I like to mark the corners of the bag with a fabric pen to show where I need to sew.
This is what the corners will look like once you've boxed them.

Now trim off the excess fabric at each corner, leaving about 1/4" of fabric beyond your stitching.

Finishing Touches
It's finally time to turn your bag! To finish it up, pull out the lining and press the raw edges into the opening so that it's even with the rest of the lining. Stitch the opening closed with coordinating thread. Since it's on the inside of the bag, the stitching won't be very noticeable. You could also do an invisible ladder stitch by hand if you don't want any stitching to show at all.
Enjoy your new zipper pouch!