


Quick and Easy Beginner Quilt

This tutorial will show you how to make a quick and easy beginner quilt using the quilt as you go method. I used fleece as the backing fabric, so there are fewer layers to worry about as you're sewing it together. With a little bit of squaring up, you can use strips from a Moda scrap bag, so your fabric is almost ready to go as soon as you buy it. And the fabric is already color coordinated, since all scrap bags contain remnants from the same fabric collection. This is a great, quick gift to make for the holidays. It ends up the size of a comfortable lap quilt, so it's not too difficult to maneuver through your sewing machine. I was able to complete this quilt in a weekend, and I think it could come together even faster with more practice.
Disclosure: This post contains affiliate links, which means I may receive a percentage if you make a purchase using these links. This won't cost anything extra to you. I only link to things I like and use, and the proceeds help me to run this blog. Thank you for supporting me!
Materials
- Aviary Yellow Scrap Bag Quilt Fabric By Joel Dewberry
- Or a generic Moda Scrap Bag
(this is cheaper, but you don't know which fabric collection you'll get)
- Or a generic Moda Scrap Bag
- 2 yards of backing fabric (I used fleece. You could also use traditional batting along with a cotton backing)
- 1/2 yard of coordinating fabric to use as a binding
- Fiskars Rotary Cutting Set
- Quilt clips
Selecting Fabric
As noted above, I used one of the scrap bags by Moda, which includes coordinating fabrics from a particular collection. I think the scrap bag is helpful if you want to make your quilt quickly and easily, but you can also pick out your own fabric at the craft store. Get about 1/4 yard of each. I had nine different fabrics, ranging in height from 4" to 10." Width-wise, they were all about 40."

Squaring up Your Fabric
Use your ruler, mat, and rotary cutter to square up your fabric. Fold each length of fabric in half, so it fits easily on the mat, and line up your fold with a vertical gridline on the mat. Trim the top, bottom, and edges to line up with gridlines on the mat.

Quilt as You Go
For this quilt, I used the quilt as you go method, which is a quick and easy way to sew the front and back of your quilt at the same time. I used this tutorial from the Missouri Star Quilt Company. Instead of using batting and a backing fabric, I just used fleece for the backing, which means there are fewer layers of fabric to work with. I got the idea from this blog post on Craftsy. I cut my fleece larger than my fabric strips, both in length and width, so I could just trim it down at the end. Because the full quilt becomes a little bulky to work with as you go along, my strips ended up "wandering" a bit, so I was glad I'd cut the fleece a little larger than I needed.
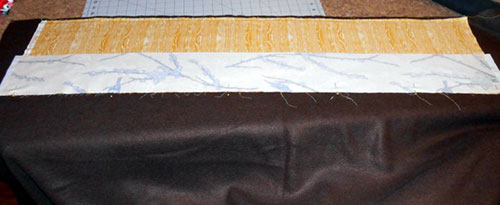
For the first strip, I clipped it to the end of my fleece (leaving a small amount of fleece to trim off later), and I sewed along the edge to hold it to the fleece. This row of stitching will get covered by your binding later on.

The next strip should be added, right sides together, on top of the previous strip so that the raw edges are matched up. You'll then fold this second strip down, so if you have a directional print, make sure that it's upside down, so it will fold down right side up. I put in a few pins to hold the layers in place.
Now fold down your second strip and iron it. My fleece was a little stretchy, so each layer looked kinda messy/puckered until I ironed it. It's amazing how much of a difference ironing makes!

Keep adding new fabric strips in the same way.

Roll the end of your quilt so that it will fit under your sewing machine.

Keep adding strips until you've reached the length you want it to be. You can see what I meant about the fabric strips wandering a bit here, but that's okay because once you trim the fleece down, no one will ever know. I left myself an additional 3-4" of fleece on all sides, which worked out well. You can also trim the selvage edges down on the fabric strips. Make sure everything is nice and even on all sides before you start binding.

Binding
I used this binding video tutorial, also from Missouri Star Quilt Company. They mention using a binding tool, which I don't have, but here's another video from them on how to use the binding tool. It looks like a useful tool, and if I find myself making more quilts, I'll probably get one.
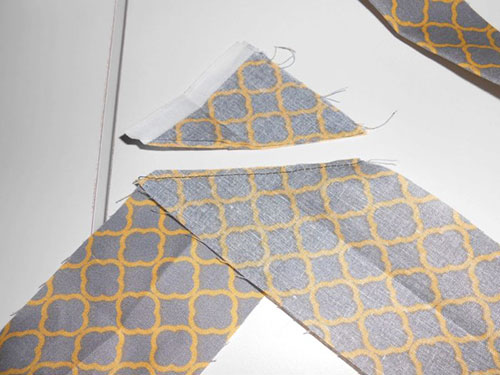
I always make this mistake, so I'm just going to highlight this point. When you're joining binding strips, make sure you joining them at a 90 degree angle, such that you can trim off the corner and leave two small triangles of fabric. Don't join them in such a way that you have to cut one of the long strips of fabric. Before sewing your strips together, take a moment to imagine cutting the corner off. Are they lined up the right way?
Sew your binding onto the back of the quilt, matching up the raw edges of the binding with the raw edge of the quilt. As noted earlier, I don't have the binding tool, so I just folded over my binding strip at the beginning and overlapped it with the other end by about a quarter of an inch.
Make more binding than you need, so that you won't run out partway through. Trim the end of your binding once you've met up with the beginning of your binding. When you fold it over to the front, the folded edge will cover the raw edge from the other end of your binding strip.

For corners, fold your binding like this. Be sure that the raw edge of the binding is still lined up with the raw edge of the quilt after folding the binding to go around the corner. See the binding video tutorial for a good description of how to go around corners.

Here's what it looks like after sewing.

Now when you fold it to the front, you have a nice, mitered corner.

Fold your binding toward the front of the quilt. I used quilt clips to hold it in place.

Here's what the front looks like once the binding is sewing in place. (Don't mind the dog hair.)

Quick and Easy Beginner Quilt
As I mentioned at the beginning of the post, I was able to finish this whole quilt in a weekend. It's a really quick and easy beginner quilt. It's simple, but it lets you showcase a few really nice fabrics. It would make a great gift for the holidays!

Want More Quilting?
Click on the images below to go to my other quilting posts:

Quilt as You Go Rainbow Throw

How to Use Fusible Batting

Design a Quilt in Adobe Illustrator
And check out my Quilting Board on Pinterest:


