


DIY Earrings out of Aluminum Cans

My earlier series of posts on making jewelry from aluminum cans has proven quite popular, so I'm expanding it. See my earlier posts on how to break apart your cans and how to make embossed earrings. In this post, I'll show you how to cut out some cute flowers from aluminum cans or lightweight craft metal, and then turn them into earrings. This is a great DIY project to recycle or upcycle some cans!
Disclosure: This post contains affiliate links, which means I may receive a percentage if you make a purchase using these links. This won’t cost anything extra to you. I only link to things I like and use, and the proceeds help me to run this blog. Thank you for supporting me!
Materials
- Aluminum cans
- Sizzix big shot cutting/embossing machine
- Sizzix triplits flower die set
- Cheap disc cutter or More expensive disc cutter
- Brass mallet to go with disc cutter
- Cut lube to go with disc cutter
- Files to clean up and smooth metal edges
- Hole punch for metal
- Alcohol inks in bottles or Alcohol ink markers
- Alcohol ink applicator
- Glossy accents
- G-S hypo cement
- Earwires
- Tiny nuts and bolts for jewelry making
- Hand drill
- Metal shears
- Sheet metal for jewelry (at least 24 gauge)
- Needle nose pliers
- Heavy duty wire cutters
Cutting Apart Your Aluminum Cans
See my earlier post on how to cut apart your aluminum cans and prepare your metal for jewelry making.

Once you're done, you'll have a pile of metal sheets you can use for jewelry.

Die Cutting Flowers with Aluminum Cans
In a previous post, I went over how to emboss aluminum discs for earrings. In this post, we'll die cut the aluminum cans.
I used my Sizzix big shot to cut out some flowers with my Sizzix triplits flower die set. You could also trace your flowers on the metal with sharpie and then use metal shears to cut out the pattern.
Below, you can see the platform, cutting pads, and aluminum can going through the machine. I placed my aluminum can so that the plain side was facing down. This will give you a slightly beveled edge on the finished pieces that showcases the plain silver side.

On the far right side below are the dies, so you can see the template that I used. The middle and left rows are pieces of aluminum can that I cut out.
Overall, the dies did a good job cutting through the thin aluminum. However, I used jewelry files to smooth down the slightly rough edges around each piece. The center holes had to be gently pushed out of each flower after cutting.

Cutting Background Discs
You could just put your aluminum flowers together and punch a hole in one of the petals for the earwires, but I decided to cut some discs out of heavier gauge metal to make the entire piece a little sturdier. Below, you can see that I used some sheets of colored aluminum 24 gauge metal. They used to have these at Michaels, but I haven't seen them in awhile. You can use any heavier gauge sheet metal for this.
I also used disc cutter similar to this one. (Here's a cheaper disc cutter that doesn't work quite as well.) You'll also need a brass mallet to hammer on the punches and some cut lube to lubricate the punches so they don't get stuck.
Coat the punch you want to use with cut lube, insert your metal sheet into the disc cutter (the one below has a sheet on the other side to balance it), and make sure the flat side of the punch is facing down toward the metal.
This is where the cheap model falls flat. You now have to hold the metal in place while you hammer it. Inevitably it takes two or three blows to cut through the metal, and it is very difficult to hold the metal precisely in place while hammering it. The more expensive disc cutter will hold the metal in place for you, leading to much cleaner cuts.

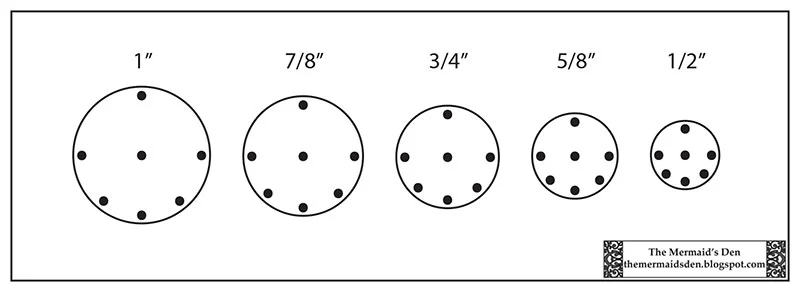
Here are some circle templates you can use to find the right spot to punch holes in your discs for a variety of earring options. The link above is a pdf version of the image below.
Once I had my discs cut out, I punched holes in the center of each disc with this hole punch for metal. With the tiny nuts and bolts that I used later on, I had to enlarge these holes a little bit with a hand drill.

Coloring Your Aluminum Flowers
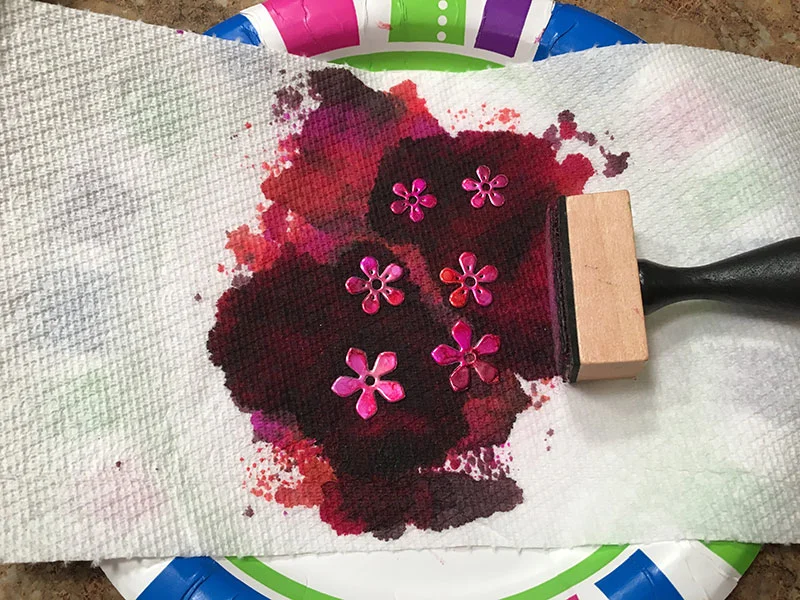
I find that alcohol inks work well for coloring metal. Here I used Ranger alcohol inks and an alcohol ink applicator. I used a few different pinks/purples, and I applied a couple of layers of color to try to make it more vibrant.
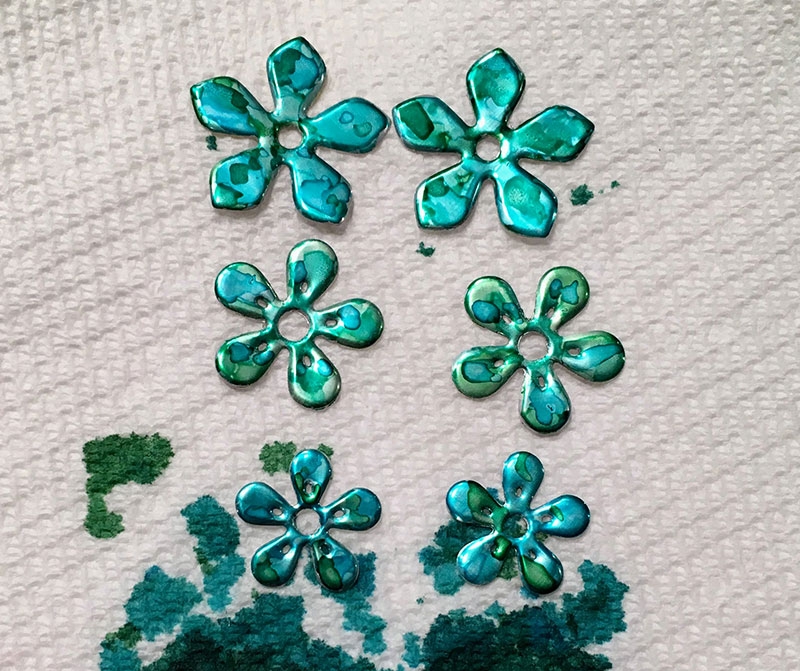
For another set of flowers, I used Spectrum Noir markers in a variety of blues and greens.

I wanted a mottled effect, so I just dabbed at each flower with the larger side of the marker, and I let the ink pool however it wanted to.
Here are the components of each set of earrings. I decided to have the design from the can facing outward on one set of earrings. On one of my previous posts, a reader mentioned using Arizona iced tea cans, which would probably look very nice.

Becuase the alcohol ink can rub off of metal over time, I coated the flowers with glossy accents. I only put one coat on the blue flowers, but I put three coats on the pink flowers, and you can see how it builds up to give a glossy domed effect.

Putting it All Together
Here you can see that I've stacked the flowers, and they're ready to come together with the discs. I tried a few different things here. Initially, I tried snap on rivets, but they were too large, and I couldn't enlarge the holes in the centers of the flowers any more without making them too flimsy. I tried using the kind of rivets that you hammer, but I've never had much luck with those. And then I found a great article on cold connections in jewelry-making that mentioned using tiny nuts and bolts.

I was so excited to discover these tiny nuts and bolts! I wish I knew about their existence earlier. I have often tried to hold together resin and polymer clay pieces in my jewelry, and when I try to use regular rivets, I end up cracking the piece or hammering the rivet crooked. While these look a little industrial, they're super easy to use, and you don't have to worry about damaging your jewelry.
The holes in the flowers were a little too large for the bolt, and it kept slipping through, so I had to add an extra nut in the front of the piece as well as in the back.

I just used my fingers to screw the nut into place, and pliers to snug it up to the back of the disc. I applied a thin layer of G-S hypo cement at the base of the bolt to help hold the nut in place. You'll also need some heavy-duty wire cutters to trim down the bolt in the back, and then the rough edges will need to be filed down.

Here's what the back of the earring looked like when I was finished.

Here are all of the pieces after being bolted together. To finish them up, I used my hole punch for metal to add holes at the top of each one for earwires

Finished Earrings out of Aluminum Cans
Here are the finished earrings. What do you think? Are you going to try to make some? Let me know in the comments below!


DIY Earrings out of Aluminum Cans


