Betsy Ross Vintage Toy Sewing Machine Guide
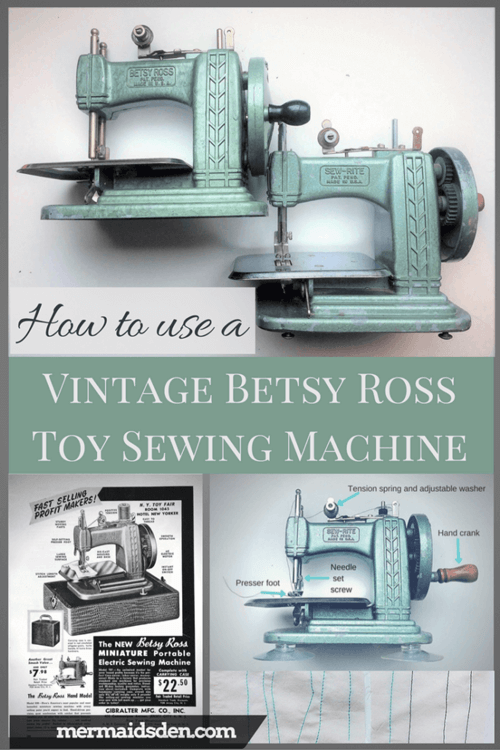
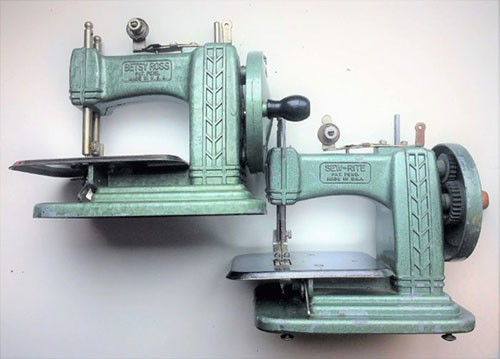
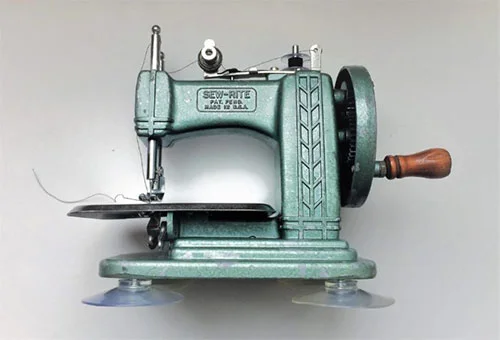
Previously, I've posted about my vintage sewing machine collection, and recently I expended it by adding two vintage toy sewing machines. They look identical, but they're different brands. One is the iconic and popular Betsy Ross sewing machine, and the other is a Sew Rite sewing machine. They were clearly made at the same factory but branded for separate companies, which was a common practice at the time. In this post, I'll go over the anatomy of a toy sewing machine, what to look for when you buy one, and how to clean, repair, and restore your vintage toy sewing machine to working condition.
Disclosure: This post contains affiliate links, which means I may receive a percentage if you make a purchase using these links. This won't cost anything extra to you. I only link to things I like and use, and the proceeds help me to run this blog. Thank you for supporting me!
The History of Betsy Ross Sewing Machines
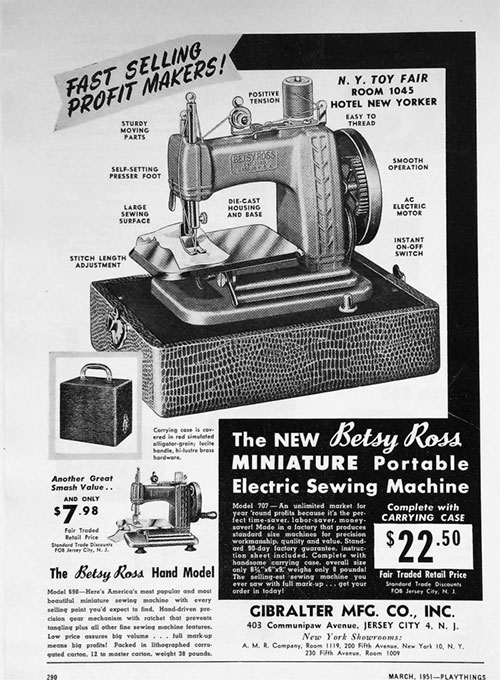
The Encyclopedia of Early American & Antique Sewing Machines has a chapter on Early Toy Sewing Machines, including the Betsy Ross. The author calls it a sturdy machine that sews rather well. He notes that it was made in the 1950s, large quantities were produced, and it was one of the last all-metal toy sewing machines.
As with most toy sewing machines, it produces a chain stitch rather than a lockstitch. Chain stitches unravel easily if you pull a loose thread at either end of the stitching, but they hold well if you secure those loose ends. The top side of the stitching looks normal, but the underside has loopy chains. You only need a top thread, rather than a top thread and bobbin thread.
The Betsy Ross sewing machine is made of die cast aluminum (not cast iron as some online listings purport). I found an old ad from a trade magazine for the toy industry, which shows how much both the electric and hand crank versions cost at the time, as well as detailing many of the features of each.
I purchased my toy sewing machines from Ebay (see link below). I bought a pair that were being sold together, which was really useful because I was able to pull together enough parts between the two of them to create one fully functioning machine. Most sellers only list one at a time, however.
Materials used:
What to Look for

When searching for toy sewing machines on Ebay or anywhere else, you'll find a lot of sellers who do not know what they have. Some will be honest and tell you that they don't know if any parts are missing or whether the machine works. Others will state that the machine is complete and in working condition when clearly it is not.
You can do a decent job of evaluating the machine from the seller's pictures and by asking questions. The most common missing parts are the presser foot, needle set screw, tension spring/adjustable washer, and hand crank. On vintage Singer toy sewing machines, the spool pin is often missing as well. On Betsy Ross sewing machines, the spool pin is attached to the tension assembly, so it won't be missing unless the entire tension assembly has been removed from the machine. However, the tension spring and adjustable washer are often missing from the tension assembly on Betsy Ross machines. Some of these parts can be replaced, and others are more difficult to find.
Once you've determined that no parts are obviously missing (or that you're happy enough to replace the parts that are missing), see if the seller will tell you whether the needle goes up and down when you turn the hand wheel and whether the feed dogs shift back and forth with each turn as well. On one of my machines, the needle moves up and down, but the feed dogs are not working, so it's important to make sure that both of these work.
Ebay seller stereoscope-singer20 stocks some parts for vintage Singer 20 toy sewing machines, which may or may not work for other vintage toy sewing machines. She sells tension spring assemblies, needle set screws, spool pins, hand crank knobs, and seam guides. I suspect that you could use the needle set screws and hand crank knobs interchangeably with most toy sewing machines, though I don't know for sure.
Cleaning and Restoring Your Betsy Ross Sewing Machine

Your toy sewing machine will need to be oiled thoroughly. Add a drop of oil anywhere you see moving parts, and add a bit of grease to any spot where there are gears (see the list of materials above for my recommendations). Turn the wheel to get the oil/grease moving, and try to zero in on any sticking points or creaky bits. I oiled the needle bar/presser foot bar, undercarriage, and hand crank. I added grease to the gears in the hand crank and underneath the machine. I ended up removing the entire tension assembly from the top of the machine--it's held in place by a couple of screws--and I dropped some oil into those screw holes as well.
Although both machines had the same outer casing, their internal parts varied slightly. The configuration of gears in the handwheel and underneath the machine differed. I've also seen Betsy Ross machines with smaller handwheels/knobs, so I think the construction of this toy sewing machine changed a bit over the course of its production run. Keep this in mind if you have your own Betsy Ross sewing machine that you're trying to fix up.

I recommend removing the needle plate, too, so you can clean underneath more easily. It's easy for bits of dust and fuzz to get caught under here.

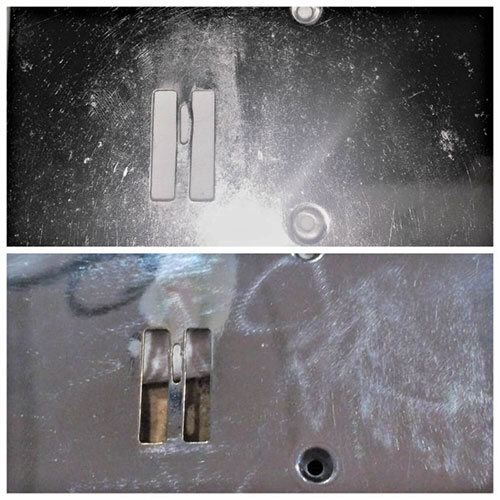
One of the needleplates was bent out of shape, probably when a needle smashed into it at some point (see top picture), but I was able to use pliers to more or less get it back into shape (see bottom picture). Before I reshaped the hole on the needleplate, the feed dogs were catching on this protrusion.
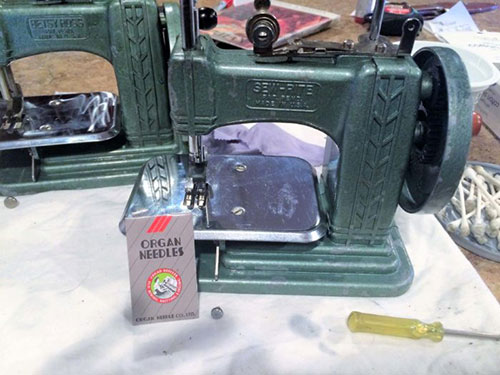
Here I've reattached the needle plate and I'm about to insert a new needle. You probably won't find these needles at a local craft shop, but they're easy enough to find online (see list of materials above for a link to 24x1 needles). You can find information on needle sizes for toy sewing machines, including the Betsy Ross here. The holes in these needles are pretty small, so I've recommended a needle holder/threader in the materials list above.
Lastly, I replaced the suction cup feet on the bottom of the machine (see materials list for link). One machine came with its original feet, but they were brittle and crumbly with age. The new suction cup feet do a great job of holding the machine in place while you're sewing.
How to Sew with Your Betsy Ross Sewing Machine
To thread your Betsy Ross sewing machine, take a look at the Singer 20 threading diagram and this youtube video (note that the creator of this video thinks that the sewing machine may need a bobbin, but it does not). The thread path for the Singer 20 is nearly identical to that used by the Betsy Ross.
In the comments for the video I linked to, one of the commenters notes that you should turn the handwheel once to allow the hook to pick up the thread before inserting your fabric and starting a row of stitches, and that you should hold onto the thread tail when you start sewing. I found that this helped to keep the tension more consistent, though you can just put your fabric in and start sewing.
To finish your row of stitches, use tweezers to pull your thread off of the hook underneath the needle plate. Then pull some extra thread down to the needle to give yourself some slack, and carefully remove your fabric. The last loop underneath the fabric will unravel the whole row of stitches if it gets pulled back through the fabric, so grab it and put the loose thread tail from your top thread through to hold it in place.
Thread tension can be adjusted by turning the washer on the tension assembly to tighten or loosen the screw that rests on the tension discs. If your machine keeps getting stuck because multiple loops are caught on the hook, your tension probably needs to be increased.
The lever underneath the needleplate area in the front can adjust stitch length (see the ad above where it is labeled).
Here are some stitch samples that I created. The stitches on the left were done before I got the new suction cup feet, and the stitches on the right were done after. You can see that the suction cups made a huge difference in quality and straightness of stitches. The tension on the second sample was also much better, since the machine was more stable.

Let me know if you have any questions or comments about Betsy Ross sewing machines--there isn't a lot of information out there on this particular model!
Update 7.17.17: A Manual and Instructions for the Betsy Ross Sewing Machine!
I've been in touch with ebay seller Shelly's High End Collectibles, who sold a Betsy Ross sewing machine, complete with manual, and she agreed to let me share the images from her listing with you! Thank you Shelly! Also, check out her store, she's got lots of cool stuff.
The following three images are from Shelly's High End Collectibles: